How to Stop and Prevent DDoS Attacks a Case Study About DDoS Protection
It happens without warning. Without reason. Without judgement. The attacks were relentless and many before have tried to save the business. Many have tried their best to stop the attack. None were successful. Hosting companies were called. Security and IT professionals ultimately were defeated without any result. The attacks continue…until….
This summer…
One man. One goal. One victory. Against all odds, he was able to mitigate the server breach within 24 hours of receiving the job. With simple, but effective, preventative measures and persistence, the attacks finally stopped. No more bombardment from the opposition. No more bandwidth overage charges. Just results.
What a week. So we have a client who was under some serious attacks this week. Here’s the situation.
Case Study DDoS Attack Prevention
First off let’s define what a classic DDoS attack is and what it can do to a company. DDoS stands for Distributed Denial of Service.
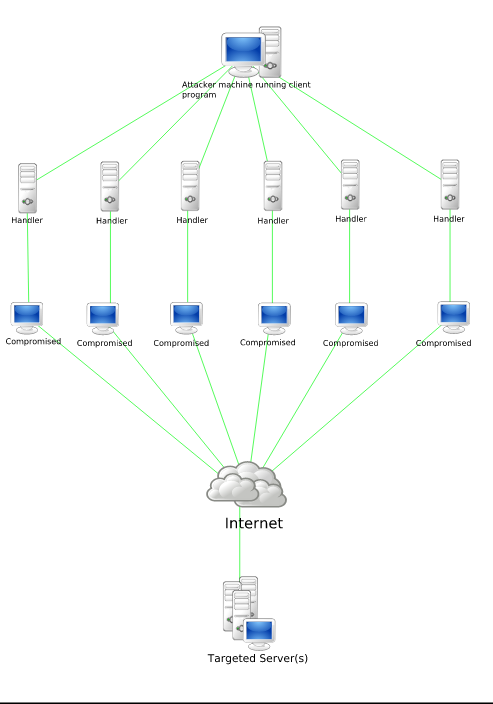
“Stachledraht DDos Attack” by Everaldo Coelho and YellowIcon – All Crystal icons were posted by the author as LGPL on kde-look. Licensed under LGPL via Wikimedia Commons
This type of an attack can squander server resources and essentially sends a very large volume of traffic to a particular server until that server is overloaded, and cannot handle any more traffic. Any new traffic, even legitimate traffic, will be denied the service as there are no more resources for said service. Hence, Denial of Service. Now, a Distributed Denial of Service attack is one in which the attack does not come from a singular source. It’s coming from multiple sources in an attempt to shut the server down without any way to stop it. Because it happens from many different angles, it is very difficult to track and prevent. The attack is extremely diversified and resembles true human traffic. Even large companies, like Sony, have to deal with these types of attacks.
Typically, there isn’t much you can do once the attack is initiated. The best case scenario, even after the steps I go over below, is to just wait it out. Eventually, the attacker will stop because it costs money to keep these alive. If they persist, like in this case study, then there are some steps you can take to prevent this and mitigate the damage. You must act quickly and be vigilant about the attack.
So here’s the situation and the case study.
He owns a small shop in Golden, Colorado and contacted LoDo Web because of a breach in his server. This server breach looks like something out of a bad tech movie. With every 9-15 seconds or so there was another visitor attempting to access the site. Some facts about the client:
- Client runs a small tangible-goods store
- Website is inherited
- Running on WordPress
- No malicious plugins or themes installed, to his knowledge
- No active security
- Server host billed over $400.00/month for overage charges
- No WordPress Support
- Hosting at Media Temple
- No identifiable trigger for the event
Some facts about the attack:
- Attackers looked like they were legitimate human traffic
- No pattern deciphered with country of origin, IP, browser, etc.
- Attacks coming from all over world
- No central location
- Scattered IPs
With no pattern in place, and about 7-8 visitors a minute this particular attack looked like it had no end in sight. Hordes of visitors from all over the world were pouring in dismantling server resources and costing the client hundreds in server hosting bills every month.
When we took the job, we did not know that the attack has been happening for over 2 months and about 5 other people have taken a look at the site. From IT Experts to Security Experts specializing in web design and development. Nobody was able to mitigate the problem. When we got to him, his server was getting inundated by hundreds of requests every hour.
The client was at a desperate spot and willing to do anything to stop these persistent attacks. After chatting on the phone and learning what we needed to learn, we finally had a chance to take a crack at the site.
Here’s how we fixed this particular DDoS attack on WordPress.
What you’ll need:
- Wordfence Plugin
- Sucuri Plugin
- CloudFlare
- Domain Registrar backend
- Host backend
- Patience
Take a deep breath. Don’t panic. This will do nothing for the prevention and protection against DDoS attacks. Just take a deep breath and we’ll begin the mitigation process.
First things first. Install the Wordfence Plugin onto your WordPress instance. This will be the first step in prevention of future attacks. Once installed, navigate over to Wordfence–>Options
Scroll down to Firewall Rules and start the lock down process. The goal here is to set up VERY strict protocols for your users and bots to prevent further intrusion on the servers. This will effectively block any IP that breaks these rules and prevent the same IP from attempting to access the site more than once. The point of this is to prevent multiple attempts from the same IP to access your site. Soon, you’ll create a list of those IPs who violated your rules and you can choose to permanently block them. 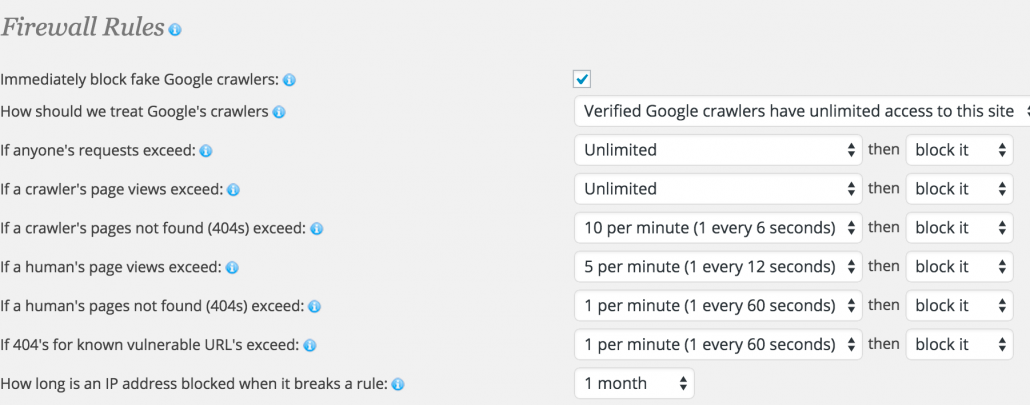
Set up your login security by blocking unknown usernames and the “admin” username. Yes, the admin username is the worst username to use for logging in. It’s easily guessed and is just inviting hackers. Set up your whitelisted IP address to prevent yourself from getting locked out:
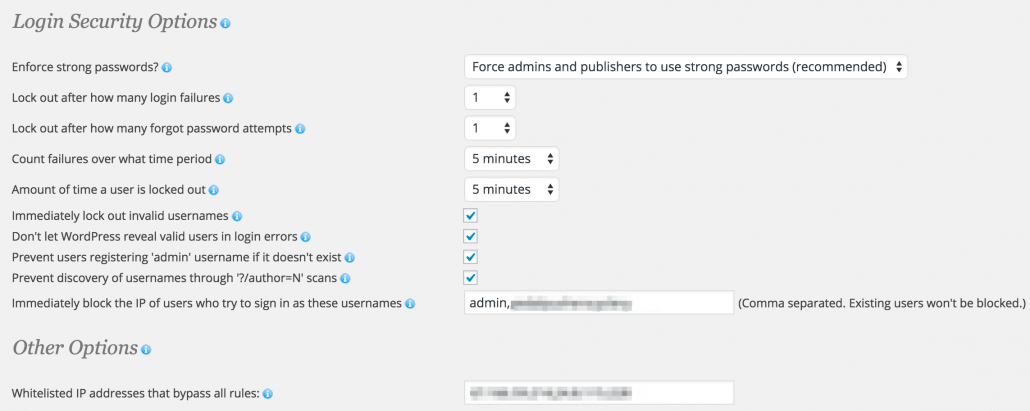
To check your IP address go to this site.
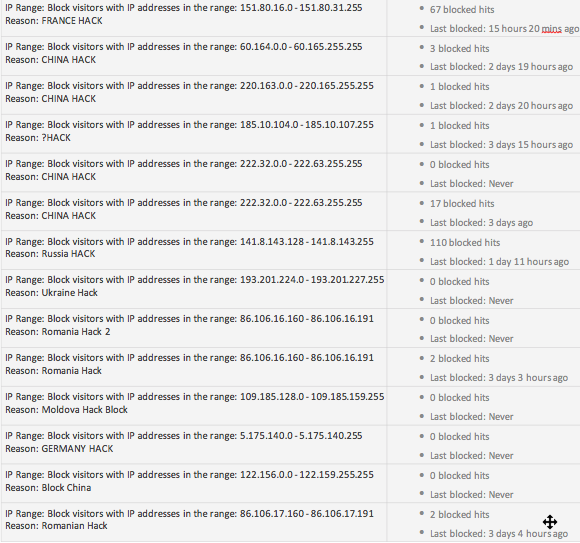
The next step is to go to Wordfence–> Advanced blocking and set up some mass IP block lists. These block lists are primarily from outside of the United States designed to block out non-targeted traffic to your site. Including all bots.
Below is a partial list of blocked IP ranges generated from the actual attack attempt. These ranges are not all inclusive, and I recommend you learn the patterns of your attackers and block the ranges that they are using in particular. These are just some of the examples that I blocked as they were attempting to access the site.
Now that Wordfence is set up we need to go over to our plugin, Sucuri. This plugin is designed by security experts for the WordPress platform specifically. The setup with this one is really fast, so no need to dwell on it. Just do it.
This is sort of a secondary preventative measure. In fact, there is a whole slew of security implementations that should take place for your site, I’m only giving you a couple of examples here.
Go to Sucuri–>Hardening. Go ahead and “Harden” all of the security features here. Everything that you feel comfortable doing.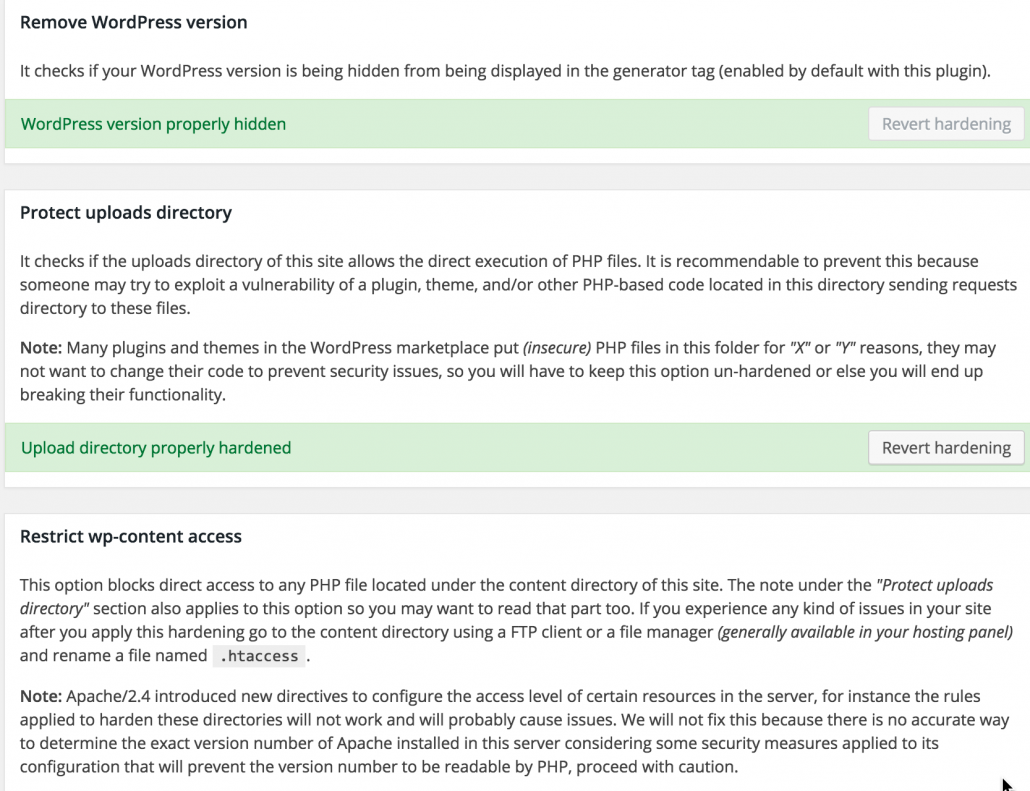
Here’s what we hardened during this DDoS attack:
- Remove WordPress version
- Protect uploads directory
- Restrict wp-content access
- Restrict wp-includes access
- Verify PHP version
- Security keys
- Information leakage
These are fairly simple steps, but is an added bonus to prevent DDoS attacks.
Cloudflare DDoS Prevention
Moving forward we enter the “meat” of the security implementation. This is a platform called Cloudflare and is exceptional at preventing security vulnerabilities. Cloudflare should be implemented at all times on your site, not just when you are under a DDoS attack. To begin, you must have access to your domain Registrar backend to be able to point the DNS to the right Cloudflare domain. The steps are outlined in detail on their website. You really just need to register with Cloudflare and they will walk you through a step-by-step process.
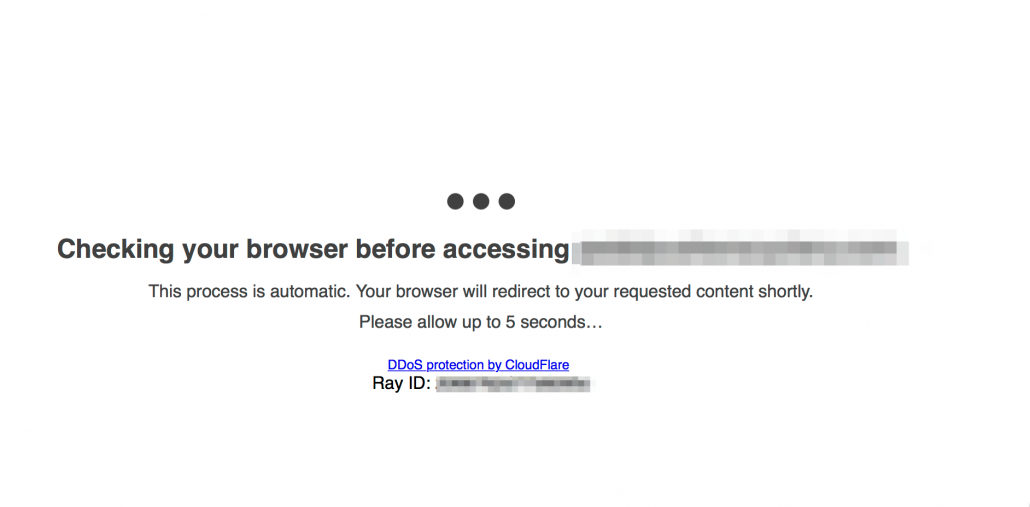
To mitigate an attack, point your DNS to Cloudflare’s servers and then wait approximately 24 hours. At that point you can set your site to “I’m Under Attack” by navigating to Firewall–>Security Level:
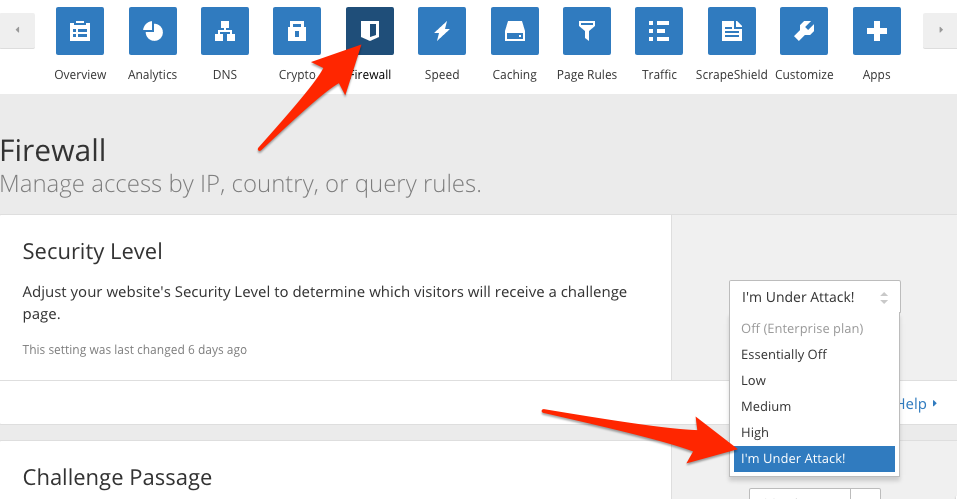
It should look like this when you have successfully activated the DDoS prevention from Cloudflare:
So what does Cloudflare actually do?
For one, Cloudflare is a caching service that essentially stores a static version of your site on their servers. This allows for a reduced load time and reduced server resource load. The second thing that Cloudflare does well is that it stands as a buffer between you and the visitor, or in this case the attacker.
When you set your status to “I’m Under Attack!”, you create this 5 second interstitial page. Cloudflare will then analyze the traffic and block it if it’s part of the DDoS, or let it through if it’s a true visitor.
The Results of the DDoS Attack Prevention / Protection
So did this mitigation even work? Did we solve the problem. You betcha.
Take a look at the amount of GPU usage on the server before and after the attack. After the mitigation, you can clearly see a decline and stabilization in regards to the traffic. This is the exact normal pattern the owner was experiencing prior to the attack. 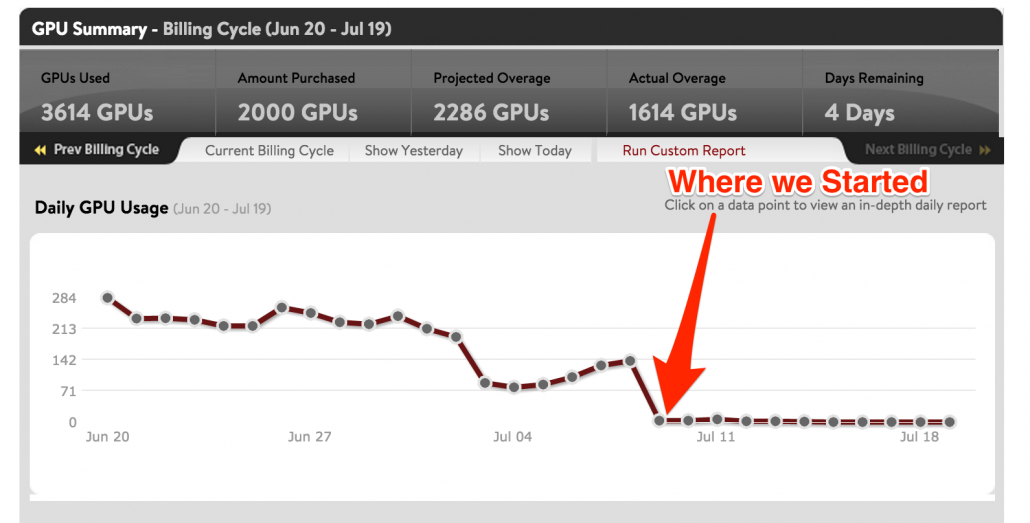
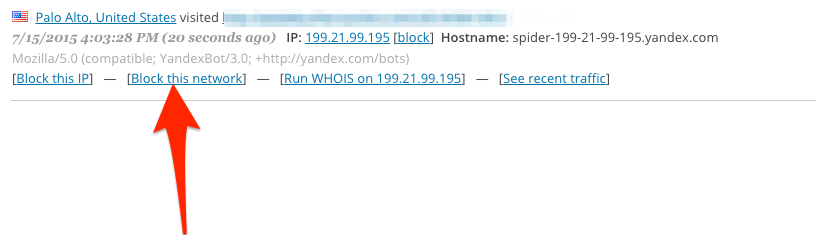
Let’s take a look at the Wordfence activity log back on the site’s servers. This is now the server host, not the Cloudflare server. The arrow specifies when we got involved. 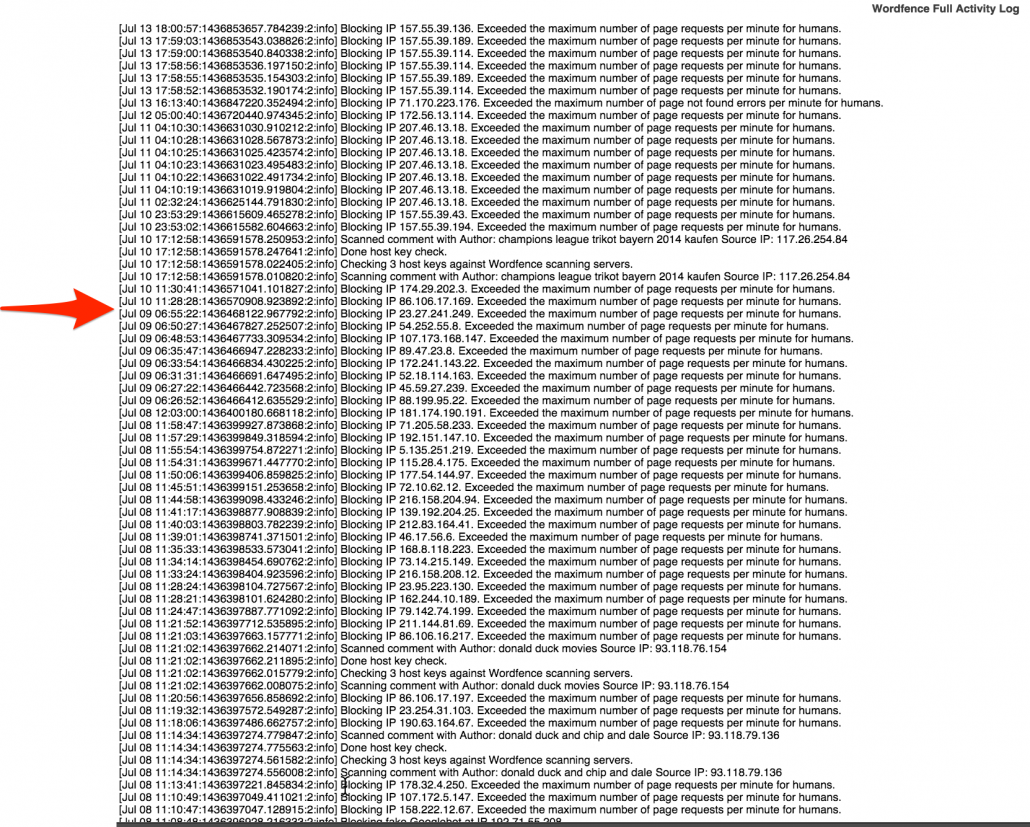
There is a clear reduction in the amount of IPs blocked by the Wordfence plugin. This means that less and less attackers are getting through to the server.
Now what kind of DDoS attack was this? With no clear pattern, I would say this type of attack is one that infects computers with a virus, like a Trojan, and takes hostage of those computers. This creates a network of “zombie” machines capable of masking themselves as human traffic. Clearly, this isn’t human traffic as it’s just sending the server requests for no apparent reason.
So who could be behind this and what can you do to prevent this to your company? It’s not clear who is behind this, but perhaps it’s somebody who the owner may have had a conflict with, or perhaps it’s a competitor trying to “get back” at this company. Who knows, really. In order to prevent this type of thing, don’t mess with someone who has a vendetta against you. In fact, always pride yourself on customer service, no matter how haughty the customer may be. After all, the customer you may be dealing with can be a hacker or may do this just for fun. Either way, you’ll end paying in hosting overage fees.
How can you ensure DDoS Protection? You really can’t, but by following the above steps, you can at least prevent most attacks.
Ultimately, it doesn’t matter who did this or how it happened. What matters is that you have the right protocols in place to handle this type of a situation. With our Premium WordPress Support, this is exactly the type of thing we prevent in the first place. All of our packages come with a security installation and we will monitor your site 24/7 to ensure that the probability of this happening is extremely low.
Have you ever been DDoSed? How did you solve your DDoS attack?


I’ve always been hearing about Cloudflare but never really knew what they did until now. Thanks for sharing this case study!
Absolutely! We use CloudFlare on all our websites as a first defense for would-be intruders! Thank you for your comment @disqus_lZf24pZRVT:disqus !